PIO Unit Testing
PIO Unit Testing allows segregating each part of the firmware/program and testing that the individual parts are working correctly. Using PIO Unit Testing Engine you can execute the same tests on the local host machine (native), on the multiple local embedded devices/boards (connected to local host machine), or on both. When testing both, PlatformIO builds firmware on the host machine, uploads into a target device, starts tests, and collects the test results into test reports. The final information will be shown on the host side with informative output and statistic.
Using PIO Remote you can start unit tests on the Remote Device from anywhere in the world or integrate with Continuous Integration systems.
Contents
Demo
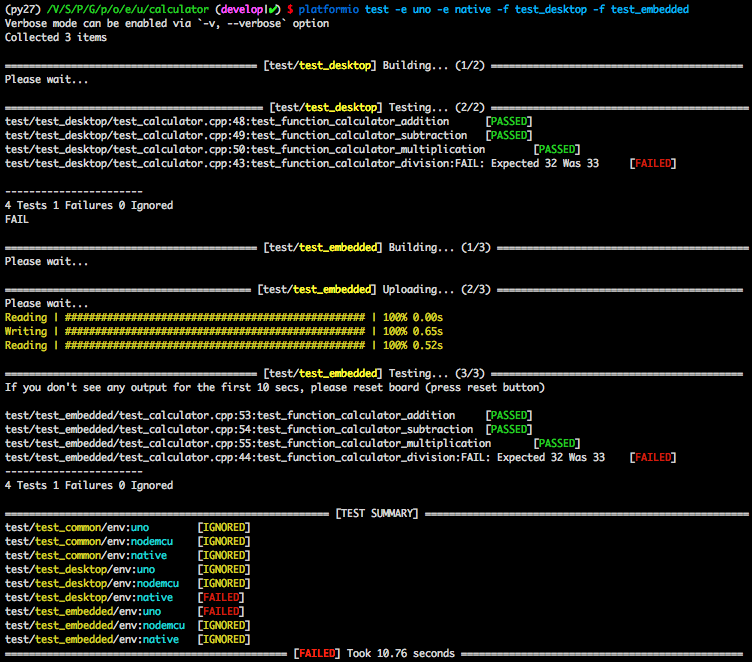
This is a demo of Local & Embedded: Calculator, which demonstrates running embedded tests on physical hardware (Arduino Uno) and native tests on host machine (desktop).
Learn more about platformio test command.
Tutorials and Examples
Tutorials
Project Examples
For the other examples and source code please follow to PlatformIO Unit Testing Examples repository.
Configuration
PIO Unit Testing Engine can be configured from “platformio.ini” (Project Configuration File)
Test Types
Desktop
PIO Unit Testing Engine builds a test program for a host machine using Native development platform. This test could be run only with the desktop or Continuous Integration VM instance.
Note
PlatformIO does not install any toolchains automatically for
Native and requires GCC toolchain to be installed
on your host machine.
Please open Terminal and check that the gcc command is installed.
Embedded
PIO Unit Testing Engine builds a special firmware for a target device (board) and programs it. Then, it connects to this device using configured Serial test_port and communicates via test_transport. Finally, it runs tests on the embedded side, collects results, analyzes them, and provides a summary on a host machine side (desktop).
Note
Please note that the PIO Unit Testing Engine uses the first available Serial/UART
implementation (depending on a framework) as a
communication interface between the PIO Unit Testing Engine and target device. If you use
Serial in your project libraries, please wrap/hide Serial-based blocks
with #ifndef UNIT_TEST macro.
Also, you can create custom test_transport and implement the base interface.
Test Runner
Test Runner allows you to process specific environments or ignore a test using “Glob patterns”. You can also ignore a test for specific environments using a test_ignore option from “platformio.ini” (Project Configuration File).
Local
Allows you to run a test on a host machine or on a target device (board), which is directly connected to the host machine. In this case, you need to use the platformio test command.
Remote
Allows you to run test on a remote machine or remote target device (board) without having to depend on OS software, extra software, SSH, VPN or opening network ports. Remote Unit Testing works in pair with PIO Remote. In this case, you need to use the special command platformio remote test.
PlatformIO supports multiple Continuous Integration systems where you can run unit tests at each integration stage. See real PlatformIO Remote Unit Testing Example.
Test Transport
PIO Unit Testing Engine engine uses different transports to communicate with a
target device. By default, it uses Serial/UART transport provided
by a framework. For example, when
“framework = arduino”, the first available
Serial will be used.
When Native dev-platform is used a native transport will be
activated automatically. See example below.
Default baudrate/speed is set to test_speed.
You can also define custom transport and implement its interface:
unittest_uart_begin();unittest_uart_putchar(char c);unittest_uart_flush();unittest_uart_end();
Examples
Custom transport for Native platform
Set
test_transport = customin “platformio.ini” (Project Configuration File)[env:mycustomtransport] platform = native test_transport = custom
Create
unittest_transport.hfile inproject/testdirectory and implement prototypes above#ifndef UNITTEST_TRANSPORT_H #define UNITTEST_TRANSPORT_H #include <stdio.h> void unittest_uart_begin() { } void unittest_uart_putchar(char c) { putchar(c); } void unittest_uart_flush() { fflush(stdout); } void unittest_uart_end() { } #endif
Workflow
Create PlatformIO project using the platformio project init command. For Desktop Unit Testing (on a host machine), you need to use Native.
; PlatformIO Project Configuration File
;
;   Build options: build flags, source filter, extra scripting
;   Upload options: custom port, speed and extra flags
;   Library options: dependencies, extra library storages
;
; Please visit documentation for the other options and examples
; https://docs.platformio.org/page/projectconf.html

;
; Embedded platforms
;

[env:uno]
platform = atmelavr
framework = arduino
board = uno

[env:nodemcu]
platform = espressif8266
framework = arduino
board = nodemcuv2

;
; Desktop platforms (Win, Mac, Linux, Raspberry Pi, etc)
; See https://platformio.org/platforms/native
;

[env:native]
platform = native
Create a
testfolder in a root of your project. See test_dir.Write a test using API. Each test is a small independent program/firmware with its own
main()orsetup()/loop()functions. Test should start withUNITY_BEGIN()and finish withUNITY_END()calls.Warning
If your board does not support software resetting via
Serial.DTR/RTS, you should add at least 2 seconds delay beforeUNITY_BEGIN(). That time is needed to establish aSerialconnection between a host machine and a target device.delay(2000); // for Arduino framework wait(2); // for ARM mbed framework UNITY_BEGIN();
Place a test in the
testdirectory. If you have more than one test, split them into sub-folders. For example,test/test_1/*.[c,cpp,h],test_N/*.[c,cpp,h], etc. If there is no such directory in thetestfolder, then PIO Unit Testing Engine will treat the source code oftestfolder as SINGLE test.Run tests using the platformio test command.
API
Summary of the Unity Test API:
-
RUN_TEST(func)
-
TEST_IGNORE()TEST_IGNORE_MESSAGE (message)
-
TEST_PROTECT()TEST_ABORT()
-
TEST_ASSERT_TRUE(condition)TEST_ASSERT_FALSE(condition)TEST_ASSERT(condition)TEST_ASSERT_UNLESS(condition)TEST_FAIL()TEST_FAIL_MESSAGE(message)
Numerical Assertions: Integers
TEST_ASSERT_EQUAL_INT(expected, actual)TEST_ASSERT_EQUAL_INT8(expected, actual)TEST_ASSERT_EQUAL_INT16(expected, actual)TEST_ASSERT_EQUAL_INT32(expected, actual)TEST_ASSERT_EQUAL_INT64(expected, actual)TEST_ASSERT_EQUAL_UINT(expected, actual)TEST_ASSERT_EQUAL_UINT8(expected, actual)TEST_ASSERT_EQUAL_UINT16(expected, actual)TEST_ASSERT_EQUAL_UINT32(expected, actual)TEST_ASSERT_EQUAL_UINT64(expected, actual)TEST_ASSERT_EQUAL_HEX(expected, actual)TEST_ASSERT_EQUAL_HEX8(expected, actual)TEST_ASSERT_EQUAL_HEX16(expected, actual)TEST_ASSERT_EQUAL_HEX32(expected, actual)TEST_ASSERT_EQUAL_HEX64(expected, actual)TEST_ASSERT_EQUAL_HEX8_ARRAY(expected, actual, elements)TEST_ASSERT_EQUAL(expected, actual)TEST_ASSERT_INT_WITHIN(delta, expected, actual)
-
TEST_ASSERT_BITS(mask, expected, actual)TEST_ASSERT_BITS_HIGH(mask, actual)TEST_ASSERT_BITS_LOW(mask, actual)TEST_ASSERT_BIT_HIGH(mask, actual)TEST_ASSERT_BIT_LOW(mask, actual)
-
TEST_ASSERT_FLOAT_WITHIN(delta, expected, actual)TEST_ASSERT_EQUAL_FLOAT(expected, actual)TEST_ASSERT_EQUAL_DOUBLE(expected, actual)
-
TEST_ASSERT_EQUAL_STRING(expected, actual)TEST_ASSERT_EQUAL_STRING_LEN(expected, actual, len)TEST_ASSERT_EQUAL_STRING_MESSAGE(expected, actual, message)TEST_ASSERT_EQUAL_STRING_LEN_MESSAGE(expected, actual, len, message)
-
TEST_ASSERT_NULL(pointer)TEST_ASSERT_NOT_NULL(pointer)
-
TEST_ASSERT_EQUAL_MEMORY(expected, actual, len)