Glossaries are files created and updated manually for use in OmegaT.
If an OmegaT project contains one or more glossaries, any terms in the glossary which are also found in the current segment will be automatically displayed in the Glossary viewer.
You define its location and name in the project properties dialog. The
extension must be .txt or .utf8
(if not, it will be added). The location of the file must be within the
/glossary folder, but it can be in a deeper folder
(e.g., glossary/sub/glossary.txt). The file does not
need to exist when setting it, it will be created (if necessary) when adding
a glossary entry. If the file already exists, no attempt is done to verify
the format or the character set of the file: the new entries will always be
in tab-separated format and UTF-8. As the existing content will not be
touched, damage to an existing file would be limited.
To use an existing glossary, simply place it in the
/glossary folder after creating the project.
OmegaT automatically detects glossary files in
this folder when a project is opened. Terms in the current segment which
OmegaT finds in the glossary file(s) are
displayed in the Glossary pane:
The word before the = sign is the source term, and its translation is (or are) the words after =. The vocabulary entry can have a comment added. The glossary function only finds exact matches with the glossary entry (e.g. does not find inflected forms etc.). New terms can be added manually to the glossary file(s) during translation, for example in a text editor. Newly added terms will not be recognized once the changes in the text file have been saved.
The source term does not have to be a single-word item, as the next example shows:
The underlined item "pop-up menu" can be found in the glossary pane as "pojavni menu". Highlighting it in the Glossary pane and then rightclicking insets at the cursor position in the target segment.[1]
Glossary files are simple plain text files containing three-column, tab-delimited lists with the source and target terms in the first and second columns respectively. The third column can be used for additional information. You can have entries with the target column missing, i.e. just containing the source term and the comment.
The encoding of glossaries is determined automatically. Of course, the encoding must be compatible with both the languages contained, so Unicode is recommended.
Also supported is the CSV format. This format is the same as the tab separated one: source term, target term. Comment fields are separated by a comma ','. Strings can be enclosed by quotes ", which allows having a comma inside a string:
"This is a source term, which contains a comma","c'est un
                      terme, qui contient une virgule"
In addition to the plain text format, TBX format is also supported as a read-only glossary format. The
location of the .tbx file must be within the
/glossary folder, but it can be in a deeper folder
(e.g., glossary/sub/MyGlossary.tbx).
TBX - Term Base eXchange - is the open, XML-based standard for exchanging structured terminological data, TBX has been approved as an international standard by LISA and ISO. If you have an existing terminology handling system it is quite possible it offers the export of terminology data via TBX format. Microsoft Terminology Collection can be downloaded in nearly 100 languages and can serve as a cornerstone IT glossary.
Note: the .tbx output of MultiTerm seems to not
be reliable (November 2013), it is better to use the
.tab output of MultiTerm instead.
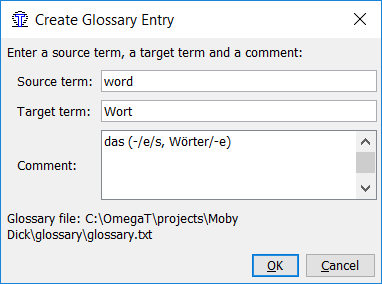
The project setting allows one to enter a name for a writable glossary file (see beginning of this chapter). Right-click in the glossary pane or press Ctrl+Shift+G to add a new entry. A dialog opens, allowing you to enter the source term, target term and any comments you may have:
The contents of glossary files are kept in memory and are loaded when the project is opened or reloaded. Updating a glossary file is thus rather simple: press Ctrl+Shift+G and enter the new term, its translation and any comments you may have (ensuring you press tab between the fields) and save the file. The contents of the glossary pane will be updated accordingly.
The location of the writable glossary file can be set in the
dialog. The
recognized extensions are TXT and
UTF8
Note: Of course there are other ways and means to create a simple file with tab delimited entries. Nothing speaks against using Notepad++ on Windows, GEdit on Linux for instance or some spreadsheet program for this purpose: any application, that can handle UTF-8 (or UTF-16 LE) and that can show white space (so that you do not miss the required TAB characters) can be used.
The results from the priority glossary (by default, glossary/glossary.txt) appear in first places in the Glossary pane and in TransTips.
As entries can mix words from priority and non priority glossaries, the words from the priority glossary are displayed in bold.
Problem: No glossary terms are displayed - possible causes:
-
No glossary file found in the "glossary" folder.
-
The glossary file is empty.
-
The items are not separated with a TAB character.
-
The glossary file does not have the correct extension (.tab, .utf8 or .txt).
-
There is no EXACT match between the glossary entry and the source text in your document - for instance plurals.
-
The glossary file does not have the correct encoding.
-
There are no terms in the current segment which match any terms in the glossary.
-
One or more of the above problems may have been fixed, but the project has not been reloaded.
Problem: In the glossary pane, some characters are not displayed properly
-
...but the same characters are displayed properly in the Editing pane: the extension and the file encoding do not match.
[1] Note that in the above case, this is just half (or even less) of the story, as the target language (Slovenian) uses declension. So the inserted "pojavni meni" in the nominative form - has to be changed to "pojavnem meniju" , i.e. to the locative. So it is probably faster to type the term correctly right away without bothering with the glossary and its shortcuts.