|
| 1. |
Introduction |
|
| |
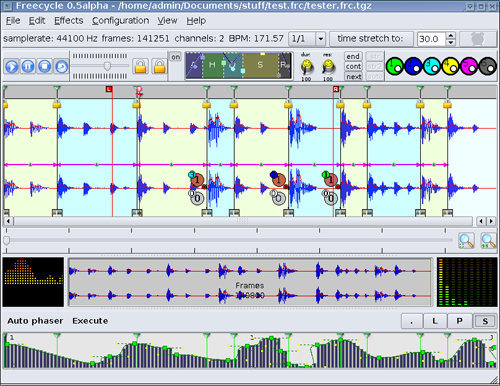
Freecycle is a beat slicer running on GNU/Linux platform using the QT toolkit, providing amplitude domain and frequency domain beat matching / zero crossing algorithms.
It exports sliced audio chunks and generates a MIDI file which can be used to play the sliced loop, or you can jam with it as soon as you've made slices using a midi keyboard or sequencer.
Freecycle also exports AKAI S5000/S6000/Z4/Z8 .AKP files to be used with your favorite sampler, and supports slice drag and drop from the application to the desktop.
It can process the audio inline using LADSPA effects, as well as applying envelopes to seperate slices.
|
|
| 2. |
Beatslicing |
|
| |
Beatslicing is the process of splitting a loop into discrete sections based on transient changes in either amplitude or frequency
so that it can be reused independently of its original tempo whilst keeping its groove.
This is achieved by a combination of auto detection and manual selection of beat points,
which are then exported as seperate audio sections,
along with a midi file with positional information,
so the loop can be reconstructed in a sequencer.
There is no need to time stretch the original loop for small variations in tempo,
but freecycle has an integrated BPM based time stretching tool integrated with it for complete flexibility.
| 2.1 |
Algorithms |
|
| |
The first (default) algorithm (time domain) detects beats by comparing the instant energy
(number of samples configured as instant energy buffer size in Configuration->Configure Amplitude Domain)
with the average energy
(number of samples configured as avergage energy buffer size in Configuration->Configure Amplitude Domain).
If the difference exceeds some threshold computed internaly and based on the variance of the signal,
then the beatline is put at that position (well it's a little bit more complicated because Freecycle then does zero-crossing,
but you should have got the point..)
The second algorithm (frequency domain) does the same thing,
but the signal is split into multiple bands and the algorithms compare the instant energy of each frequency band with the average energy of that band.
That gives you the posibility to beatmatch the signal with continuous amplitude but varying frequency
(eg. a flute playing legato notes).
Configuration->Configure FFT-> Beatmatching FFT gives you the parameters for this algorithm.
Window is equivalent to the [instant energy buffer size].
Average energy is hardcoded as 44032 frames.
If you want to know more about the above two algorithms please read the following
pdf
as it served as the basis for these two algorithms.
The aubio
algorithms are well known among DSP experts, which I'm not.
Please search on the web if you want some more detailed information about those.
Feel free to post your findings on freecycle-users :)
|
|
|
|
| 3. |
File management |
|
| |
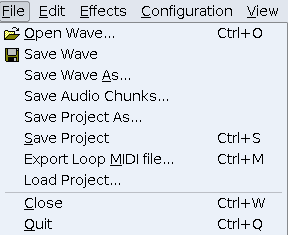
All file management is done thru the standard file menu bar item.
Freecycle uses its own native format for storing your projects (*.frc.tgz).
When a project is saved in this way all beatlines,
envelope settings,
midi assignments and effects are also saved so they can be restored at any future point.
| 3.1 |
Loading |
|
| |
Freecycle can currently import audio files of type *.wav and *.aiff as well as its own *.frc.tgz project files.
When Freecycle is initially launched the only menu options available are 'Open Wave...' and 'Load Project...'.
Both of these options open a standard file browser dialog so you can select the file you wish to work with.
| 3.1.1 |
Load Project... |
|
| |
When a project is loaded all of Freecycle's parameters are restored from the project file.
|
|
| 3.1.2 |
Open Wave... |
|
| |
When a *.wav or *.aiff file is opened all of Freecycle's parameters are reset to their defaults.
|
|
|
|
| 3.2 |
Saving |
|
| |
Freecycle can save an entire project,
a complete wav file with effects and envelope processes in place,
seperate audio chunks,
midi files and Akai program files.
|
3.2.1
|
Save Project
|
|
| |
Saves the current Freecycle project, including beatlines, envelope settings, midi assignments and LADSPA effect settings using the *.frc.tgz format.
|
|
|
3.2.2
|
Save Project As...
|
|
| |
As 'Save Project', but using a new name.
|
|
|
3.2.3
|
Save Wave
|
|
| |
Saves the entire audio section with any effects and enveloping applied to it.
|
|
|
3.2.4
|
Save Wave As...
|
|
| |
As 'Save Wave...', but using a new name.
|
|
|
3.2.5
|
Save Audio Chunks...
|
|
| |
Saves each locked audio slice into a selected folder.
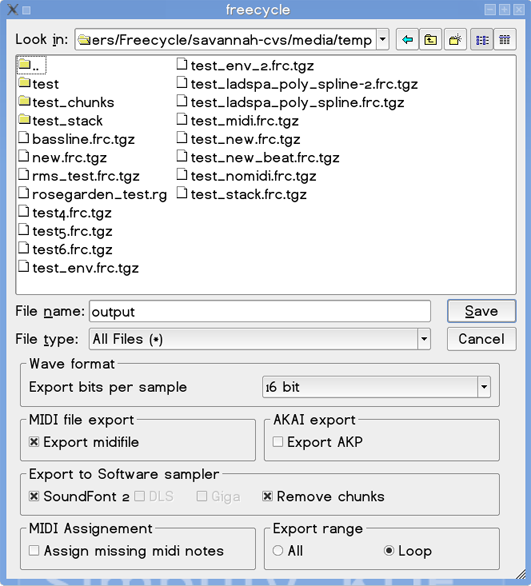
The export dialog has options for creating MIDI files and AKP files for playing back the sections in sequencers or in hardware samplers.
It can also create soundfont2 files so the sliced samples can be loaded into your soundcard for playback with a soundfont player.
Finally there is an option for exporting all slices or just those between the loop points.
|
|
|
3.2.6
|
Export Loop MIDI file...
|
|
| |
Exports a MIDI file to play back the currently locked slices.
|
|
|
|
|
|
| 4. |
Transport controls |
|
| |
As well as the basic transport controls,
Freecycle supports instant playback by left clicking at the top of the wave view area,
where Freecycle will play from that point until the mouse is released, and playback between 2 beatlines by right clicking in the same place.
Freecycle also supports JACK connectivity.
| 4.1 |
Play |
|
| |
Plays the loop from the leftmost point, unless in cycle mode, when it plays from the left locator.
[shortcut : space]
|
|
| 4.2 |
Pause |
|
| |
Pauses the playback. Pressing play will subsequently resume from the paused position.
[shortcut : space]
|
|
| 4.3 |
Stop |
|
| |
Stops playback. Pressing play will resume from the leftmost point or from the left locator again.
|
|
| 4.4 |
Cycle |
|
| |
Toggles cycling between the left and right markers on and off.
[shortcut : /]
|
|
| 4.5 |
Left and right locators |
|
| |
To set the locators use ctrl & left or right mouse buttons in the wave view area.
As long as you hold down the ctrl key and mouse button you can slide either locator,
and you will see a bar overlayed on the wave showing how many beats the current loop is.
(at least two beatlines must be detected for this feature to work)
Locators can also be moved by right clicking and dragging them.
If the locator overlaps a beatline be careful to right click on the locator outside the 'lock', 'move' or 'delete' zone of the beatline.

|
|
|
|
| 5. |
Wave view
|
|
| |
The wave view area is the main work area of Freecycle.
It shows a representation of the wave file in either amplitude or frequency mode,
beatlines,
loop locaters and midi assignment
as well as allowing for the
selection of regions for cropping or
zooming.
| 5.1 |
Selecting regions |
|
| |
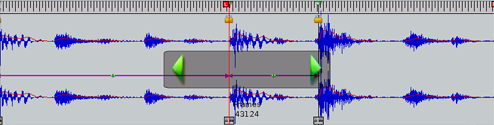
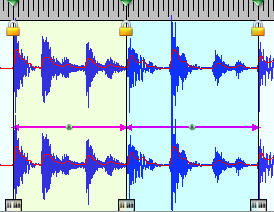
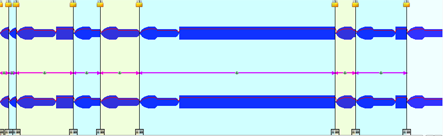
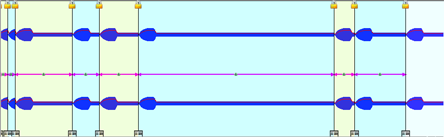
A region is selected by left clicking the mouse at a point in the wave,
holding the button down whilst moving to the desired end point and then releasing the mouse.
Left clicking and dragging of either border allows for the resizing of the region.
The selected area is shown as a grey overlayed rectangle with a darker grey inner section
that can be used to slide the selection to the left or right.
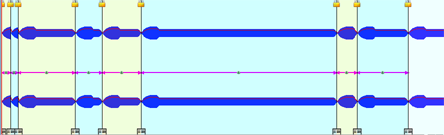
The first image shows a selection being made.
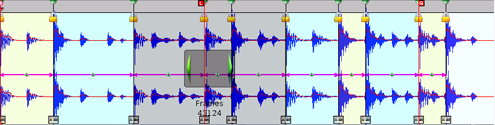
The second image shows the section zoomed to fill the area
Regions can also be cropped from the 'Edit' menu where everything outside the selected region is thrown away.
|
|
| 5.2 |
Zoom |
|
| |
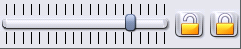
The wave view area can be zoomed in and out for precise positioning of beatlines.

Moving the slider to the right zooms in, left zooms out.
The left magnifying glass tool zooms a selection to fill the available area.
The right tool zooms all the way out again.
It is also possible to change the zoom by dragging the borders out in the overview area.
|
|
| 5.3 |
Amplitude view vs. Spectrogram view |
|
| |
Whilst most rhythmical loops have distinct transients in the amplitude domain,
sometimes a different approach is needed to extract 'hitpoints' accurately,
especially in the case of heavily compressed audio.
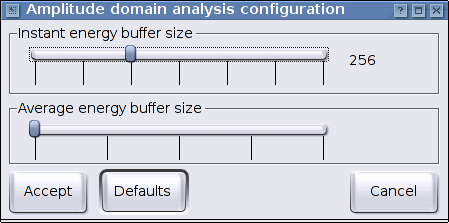
The amplitude view should be familiar, and is configured from Configuration -> Configure amplitude domain.
The red line running thru the waveform shows its RMS (average power).
The parameters available for adjusting are
- Instant energy buffer size
- Instant energy is calculated as the sum of all the amplitudes within the selected buffer size.
If the entire sample is 25600 samples long and the Instant Energy buffer size (or window) is 256 samples then
the sample will be divided into 1000 sections and each section will be compared against the average.
The lower this number is the better the resolution, but also the higher chance of 'double hits'.
- Average energy buffer size
- Average energy is never calculated for the whole sample,
but is rather based on the average amplitude of a larger window
surrounding the current Instant energy buffer that is being analysed.
A beat is detected when the Instant energy level exceeds the Average energy level.
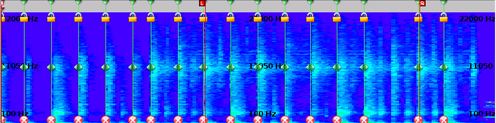
Frequency analysis begins with the same process of creating an Instant energy buffer and an Average energy buffer,
this is then passed thru a Fast Fourier Transform,
so instead of having a sample size of x,
we now have an x band frequency spectrum to work with which shows the wave form in terms of energy.
This image is the same wave form as the amplitude view above using frequency analysis.
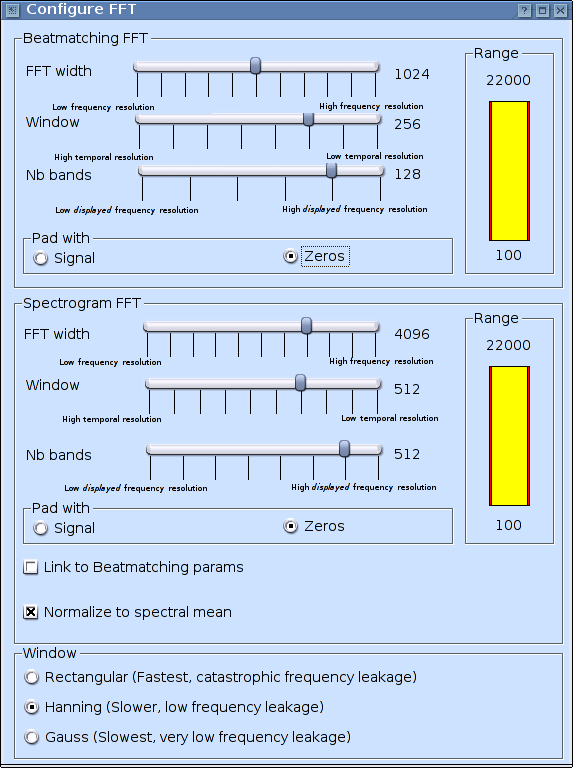
Configuration of the FFT is split into three parts,
a section for beatmatching, a similar section for visual rendering and another section for the window type.
The common parameters for both beatmatching and spectrogram are
- FFT width
-
This parameter sets the number of samples taken for computing the FFT.
The bigger this value is, the better Frequency resolution you will achieve.
- Window
-
This parameter sets the amount of samples the 'FFT width' will advance on each step.
It will set the maximum 'Temporal' resolution/precision of the beatmatching algorithm.
The difference between 'FFT width' (bigger) and 'Window' (smaller) is padded with either 'Signal' or 'Zeros'.
- Number of bands
-
This parameter controls how many frequency sub-bands to split the sample into for analysis.
(this is the setting that affects the accuracy the most, and consequently hits performance the hardest).
Those bands are obtained by summing the correspondent amount of values in the resulting FFT.
- Padding
-
Padding is used to fill the FFT with values coming *after* window samples are taken.
It can continue to be taken from the signal (giving an increased low frequency resolution),
or can be padded with zeros (giving a better mid-high frequency resolution).
The spectrogram section also has options to link itself to the beatmatching parameters,
in which case local settings are overridden by the section above it,
and an option to Normalize to the spectral mean,
which finds the highest energy point of the sample
and then increases the energy across the whole sample to the range maximum for clearer display.
The window options select the smoothing algorithm used to reduce aliasing before wave data is passed into the FFT.
FFT assumes that each data chunk that is sent to it is tileable, ie. the start values match the end values.
The windowing algorithms act as an amplitude envelope shaper to smooth off larger transients.
Rectangle is the crudist and fastest, with little or no smoothing,
Hanning is a basic sinusoidal filter with reasonably good performance,
Gaussian is the best filter, although it involves heavy processing.
|
|
| 5.4 |
Overview bar |
|
| |
The overview section contains a realtime oscilloscope, a scaled overview of the current wave and a realtime frequency meter.

- Realtime Oscilloscope
- Shows the waveform of the sample as it is playing.
- Scaled wave view
- Shows the complete wave form scaled to fit
- The highlighted area shows the section that is visible in the wave view area and its size in frames.
- The zoom level in the wave view can be adjusted from here
by left clicking and dragging either edge of the highlighted area.
- The visible area in the wave view can be changed by left clicking the highlighted area and moving it.
- Realtime Frequency meter
- Shows the frequency characteristics of the current wave as it is playing
|
|
|
|
| 6. |
Beatlines |
|
| |
The core of Freecycle's functionality revolves around the discovery and manipulation of 'Beatlines'.
Beatlines split the wave form into slices based on either rhythmic or frequency transitions,
allowing the user to re-order parts of an existing loop in new ways,
or to use a fixed tempo loop in a time variant style whilst still keeping the original groove.
Whilst Freecycle tries to automate the detection of beatlines as far as possible,
it still allows for their manual creation, deletion and moving as needed.
The majority of operations on beatlines are accessed thru the right mouse button.
| 6.1 |
Threshold setup |
|
| |
Freecycle will auto detect beatlines for you derived from a threshold setting.
The threshold slider control works in real time,
showing you discovered beatlines as the threshold is adjusted.
The threshold control goes from most sensitive on the left to least sensitive on the right.
|
|
| 6.2 |
Locking / unlocking |
|
| |
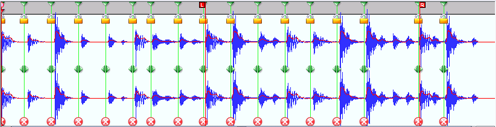
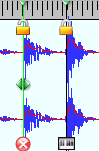
Beatlines have two states, locked and unlocked,
with most processes and operations being applied to the slices between locked beatlines,
the chief exception being effects, which are applied to the whole wave form.
To quickly lock or unlock all visible beatlines use the closed or open padlock tools.
When a beatline has been locked it has a small closed padlock symbol at the top of it
and a keyboard symbol at the bottom for midi assignment.
When unlocked it has an open padlock symbol at the top and a red cross symbol at the bottom.
The screen shot shows an unlocked and a locked beatline.
|
|
| 6.3 |
Operations on unlocked beatlines |
|
| |
There are 3 basic operations that can be performed on unlocked beatlines.
- Move
- To move an unlocked beatline put the mouse over the small green arrows and right click and drag it.
- Remove
- To remove an unlocked beatline right click on the red cross.
- Lock
- To lock an unlocked beatline right click on the open padlock.
|
|
| 6.4 |
Operations on locked beatlines |
|
| |
Once you have some beatlines lined up and locked you can start having some major fun :)
Freecycle allows you to assign different midi keys to each locked beatline thru the keyboard widget
so you can jam with the loop straight away from a keyboard,
or thru a sequencer,
and it allows you to drag and drop slices onto each other,
either from the same wave or from another instance of Freecycle,
to reorder the loop instantly.
For notes on configuring your MIDI setup see here.
| 6.4.1 |
Midi assignment |
|
| |
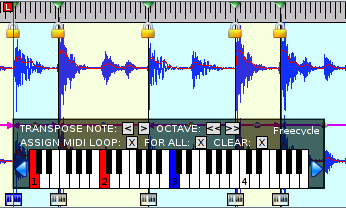
The small keyboard icon at the bottom of each locked beatline opens up on a left click to present an interface for assigning Midi notes to each slice.
An unassigned beatline has a black and white keyboard, an assigned slice has a red keyboard and the current slice has a blue one.
| 6.4.1.1 |
Keyboard widget |
|
| |
The keyboard widget's main area is taken up with a virual keyboard.
Red keys show already assigned notes, the blue key is the assigned note for the current beatline.
Notes are assigned and unassigned to beatlines with a left click.
Once a note has been assigned it can be transposed one note at a time
or by a whole octave using the 'Transpose note' chevrons at the top of the widget.
The visible area of the keyboard can also be transposed by left clicking on the blue arrows
at either end of the keyboard.
All assigned notes can be cleared by left clicking on the 'Clear' box.
The quickest way to assign Midi notes to all locked beatlines is to open the Keyboard Widget for any locked beatline,
select the start note for the first audio slice and then left click on the 'For All' box.
This will auto allocate a seperate semitone to each slice for you.
The 'Loop' and 'For All' options set whether this applies to all locked slices,
or those within the left and right locators.
To close the keyboard widget left click anywhere away from it in the wave view area.
|
|
|
|
| 6.4.2 |
Beat rectangle |
|
| |
The beat rectangle is the space between two locked beatlines.
Its limits are denoted by the purple arrowed line, with a green dot in its middle.
Most beat rectangle operations are accessed thru the right mouse button.
| 6.4.2.1 |
Drag and drop |
|
| |
Freecycle supports dragging and dropping internally, with the desktop and with other instances of Freecycle.
Drag drop actions within Freecycle are initiated by pressing the right mouse button down on the green dot.
From there it possible to drag slices to the desktop or folder, where the slice will be saved as a wav.
To insert an audio section drag a wav file from the desktop or folder into a beat rectangle and let go,
the new slice will then be added to the waves stack for that slice and replace the existing wave form.
Drag and drop between instances of freecycle is implemented in the same way, using the right mouse button.
|
|
| 6.4.2.2 |
Replaced waves stack |
|
| |
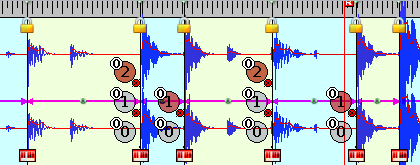
As Audio slices are dragged and dropped into different positions they are added to the replaced waves stack.
These layers can then be assigned to 'scenes' to allow 'on-the-fly' one click rearranging of the loop.
The layers are shown in the wave view area as big coloured numbered circles with smaller circles inside them.
The numbers in the big circles denote the stack position (and counts from zero),
the numbers in the small circles denote which scene the current layer is assigned to
(zero meaning unassigned, one to six meaning assigned).
You can have as many layers as you like for any audio slice, but there are only six scenes.
To select a layer for a slice right click inside the big numbered circle and the circle turns brown.
To delete a layer from the stack right click in the small red circle hanging off the layer in question.
To assign a scene to a slice right click in the small white circle.
Each click cycles thru to the next channel.
To change between scenes left click in the big circle of the scene controller.
To set all currently selected stack items to a specific scene click in the desired scenes small circle.

|
|
|
|
|
|
|
|
| 7. |
Envelope |
|
| |
Freecycle has a realtime 5 stage envelope control which gets applied to each sample slice,
the results of which are visible in the wave view area.
Envelope settings are saved with a project.

| 7.1 |
On / off |
|
| |
Toggles the envelope on and off. |
|
| 7.2 |
Parameters |
|
| |
The envelope is made up of five adjustable stages.
Squares can be moved left and right by left clicking on them,
circles can move in any direction, but cannot cross a vertical line into another section.
| 7.2.1 |
Attack |
|
| |
The time taken from the beginning of the event before it reaches maximum amplitude.
|
|
| 7.2.2 |
Hold |
|
| |
The time the maximum amplitude is held. |
|
| 7.2.3 |
Decay |
|
| |
The time taken for the amplitude to drop to the sustain level. |
|
| 7.2.4 |
Sustain |
|
| |
The level the event remains at for the rest of its duration. |
|
| 7.2.5 |
Release |
|
| |
The time it takes for the amplitude to reach zero at the end of the event. |
|
|
|
| 7.3 |
Duration |
|
| |
This controls in milliseconds the entire duration of the envelope from the start of a locked beatline.
It is the sum of the A+H+D+S+R stages, or in terms of a traditional envelope the note duration plus the release time.
|
|
| 7.4 |
Resolution |
|
| |
This controls the resolution of the envelope in terms of frames
(how fast the bezier curve in the envelope widget is evaluated)
and is currently locked at 100 frames.
|
|
| 7.5 |
Modifiers |
|
| |
As freecycle has no traditional note down and note up events to trigger the envelope
extra modifiers are provided to help emulate this.
| 7.5.1 |
End |
|
| |
After the envelope duration has completed the envelope is cancelled and the slice plays unprocessed.
|
|
| 7.5.2 |
Continue |
|
| |
After the envelope duration has completed the envelope stays at the same level to the end of the slice.
If a release level has been set then it stays at the release level,
i 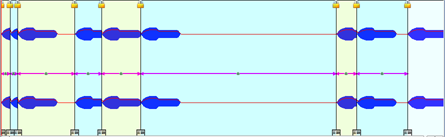
Otherwise it stays at the sustain level.
|
|
| 7.5.3 |
Next |
|
| |
The envelope goes thru the A+H+D stages and then stays at level S until just before the next locked beatline,
then it goes thru R.
|
|
|
|
|
|
| 8. |
LADSPA effects |
|
| |
Freecycle supports the
LADSPA
plugin architecture for inline effect processing.
Effects settings are saved with a project.
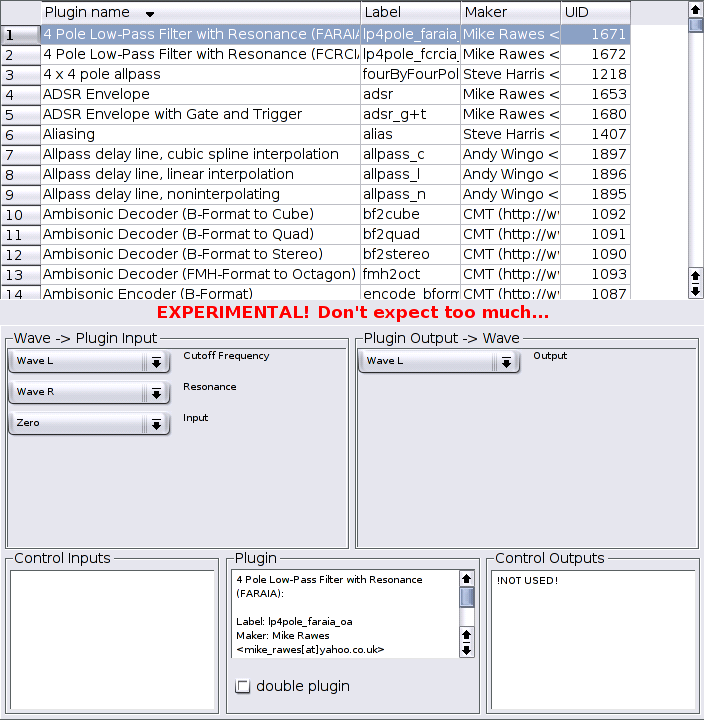
It says 'EXPERIMENTAL' for a reason, crashing plugins will take Freecycle down with it,
so save your project before trying out a new plug :)
| 8.1 |
Adding, configuring and removing effects |
|
| |
The effects area only becomes visible when a LADSPA effect has been activated.
Effects are added and removed from the effects menu.
Only one effect can be used at a time.
The top grid area of the Add LADSPA plugin window shows all the found plugins on your system.
Left clicking on one brings up its input and output connections in the area below.
Depending on the effect and whether your wave is mono or stereo make suitable connections and press apply.
|
|
| 8.2 |
Selecting parameters and drawing values |
|
| |
The editing of effects is done by setting values for a parameter at a specific point of the waveform.
The resolution or zoom in the effect drawing area mirrors that of the wave view,
so you can see exactly part of the wave form you are setting an effect value for.
To select a parameter to edit for the current effect left click on the Effects name
and a list of all available options will be presented to you.
The are two methods of applying changes in values,
either on mouse up (the default)
or in realtime as you draw.
To change between these modes use the Execute button.

| 8.2.1 |
Freehand |
|
| |
Hold the mouse left button down continuously as you move
and each vertical line will move to the height of the mouse pointer as it moves by.

|
|
| 8.2.2 |
Line |
|
| |
Hold the mouse left button down and move the mouse to the destination point.
When the mouse button is released a straight line will be drawn between the 2 points.

|
|
| 8.2.3 |
Polyline |
|
| |
Each click of the left mouse button sets a new point.
Straight lines are drawn between each point.
Points can be moved by left clicking and dragging them,
points can be removed by right clicking them.

|
|
| 8.2.4 |
Spline |
|
| |
Similar to polyline, but with a smooth curve drawn between each point.
The same rules apply for moving and deleting points,
with the exception that the small yellow points can also be moved by left click and dragging them to alter the shape of the curve.

|
|
|
|
|
|
| 9. |
Sound output |
|
| |
Freecycle currently supports the JACK audio subsystem, and as such can be interlinked with any other JACK enabled software.
For more information on jack see http://jackit.sourceforge.net/.
Freecycle also uses the portaudio library for sound output if the JACK daemon is not found to be running on your system.
For more information on portaudio see http://www.portaudio.com/.
|
|
|